How to Navigate the WordPress Dashboard and Create a Blog Post
Many of our business website clients have blogs on their sites. Often times, they will need to create a new blog post or update content. I am going to go over how to navigate your WordPress dashboard and create a blog post.
The first step is to login to your business website via the WordPress Admin. The creator of your business website should have provided you with your login credentials. To get to the login page, simply type in ‘yourwebsite.com/wp-admin’ in your browser. You’ll see a login area similar to this:

Once you have typed in your username and password, WordPress will take you directly to your dashboard. Your dashboard will look like this:

On the left-hand side, you will see your menu. For this tutorial, we will only be concerned with the “Posts”, “Media”, and any related sections. The Posts section is where all your blog post will go. If you already have posts in this section, it will look something like this:

Here you will see a list of all your blog posts. From left to right, you will see your blog posts feature image, the title of your blog, the author, what category you assigned it, any tags, comments, and finally, the date published.
Let me explain these categories in more detail before showing you how to create a new post.
Image
This is known as the Featured Image of your blog posts. It is the image chosen as the representative image for your post. How this image gets displayed is up to the theme that your website has. For example, this business website theme automatically places the featured image at the top of the blog post.

You also have the option to choose a featured image but not display the image on the post. I will show you how to do this in the Create your Blog Post section.
Title
The title of your blog post is the first thing your readers will see so you want to make sure you are getting your audience interested to click through and read the rest. Here are some tips on creating better blog titles.
- Use popular headline formulas that perform well
“How to” headlines
Number headlines like “Top 10 …”
Scarcity headlines like “Today only…” - Keyword Research
If you are running SEO as part of your business most likely you’re already doing keyword research. The reason keyword research is important is that it allows you to figure out what your audience is interested in. When writing your blog posts, you will then use the keywords in your posts to draw your readers to your blog.
Author
In WordPress, you can add contributors, editors, and authors to your blog. Each role is different. An Author can edit and delete their own posts. You can add authors by going to the Users section in your dashboard menu and adding a new user with the Role of “Author”

Categories
The Categories section in WordPress is used to group your content by subjects. You have the ability to create your own categories in the “Categories” submenu of the Posts.

For example, if you are a food blog, you might want to add categories like soups, desserts etc. If you don’t select a category for a post, WordPress will automatically assign it a “default” category.
Tags
Tags are another way to classify your posts. When creating tags, think of the reader and how they will benefit from tags while navigating your content.
Comments
In WordPress, you have the option to enable or disable comments for your blog posts. You can change these settings in the Discussion submenu under Settings.

Date
You have the option show change your date format for your blog posts by going to Settings > General.

Now that we’ve covered all the main sections of blog posts let’s make a new post!
Create your Blog Post
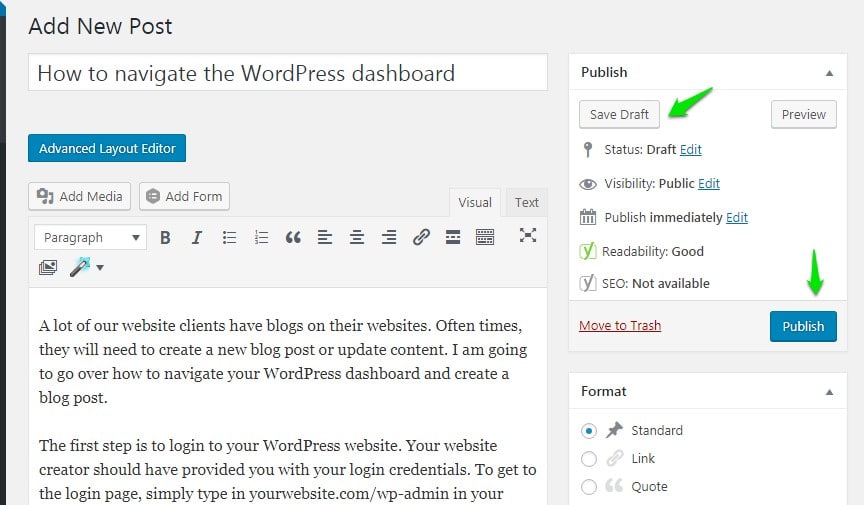
Navigate to the Posts section and click Add New. You can either click the “Add New” button on the Posts page or click the “Add New” in the submenu.

Start by adding your Title in the Title field of the blog post. Right below that, you will see a blank box where your content will go. Here you will add your text, images, links and any information you want to display.

If you scroll down further, you will see the Categories and Tag section on the right-hand side.
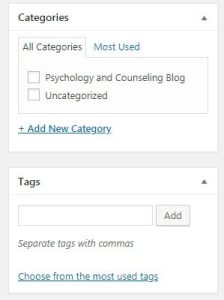
Here, you will choose your blog’s category and tags if you so decide. These are optional but WordPress will create a default category if you do not choose one.
If you scroll down even further, you will see the Layout settings for your blog.

This will default to the theme of your business website, but you have the option to make changes. Simply click on the arrows to the right and choose the desired layout for that setting.
Underneath the Layout settings, you will see the Featured Image section. Here you will click on “Set featured image” where your Media Library will open up. All previously uploaded images will appear here. If you have not uploaded the image to your media library yet, click on the “Upload Files” tab where you can select the file from your computer.


Once you have completed your post, scroll up to either publish or save your post as a draft.
Be sure to check out our past website projects, and if you’re interested in a new business website, or marketing strategy for your company contact G4 Design House today!
G4 Design House is proud to offer its services nationwide, but especially locally in San Diego and surrounding areas and cities: Chula Vista, Encinitas, Escondido, San Marcos, Del Mar, Oceanside, Carlsbad, Temecula, Anaheim, and Los Angeles.